

While drywall is an easy and affordable way to finish the interiors of a home, it does tend to develop dents and holes over time. Roughhousing and furniture-moving will eventually leave the walls of your home with at least one hole. But don’t panic if an elbow or a bed knob puts a dent in your wall — patching and repairing damaged drywall is one of the easier home DIY repairs. Continue reading to learn why.
Grab Some Spackle

For little dents, nail holes, and general unevenness, try drywall spackle. Use a small and flexible drywall knife and gently spread a thin layer of spackle over the problem area. If you need to build up to level the area, let the spackle sit for 10 to 15 minutes between layers. After the spackle dries completely, sand it until it’s smooth with the surrounding wall, then paint.
Try a Strip of Tape

Cracks and long dents caused by the edges of doors or tables are a little trickier to cover. If the damage is narrow, applying a strip of fiberglass drywall tape over the surface may be enough to stabilize it. This will work only if there’s at least an inch on either side of the crack or dent for the tape to adhere to. Wider rolls of drywall tape make it easy to cover wider dents. You’ll still need to apply a layer of drywall compound or spackle over the tape to finish the job and smooth the surface. After the compound or spackle dries and hardens completely, sand lightly so the tape doesn’t become exposed. Don’t try to stretch tape over larger areas to patch them — there’s a better method for that.
Use a Metal Mesh Patching Kit
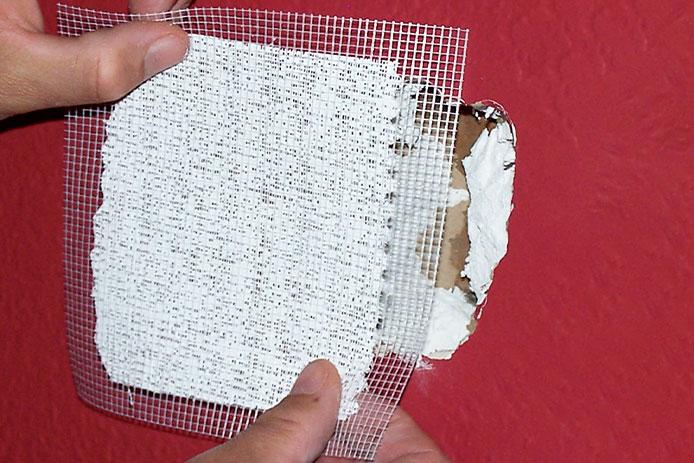
To cover small holes and punctures from things like doorknobs, pick up a drywall patching kit that includes both mesh tape and a metal mesh sheet for the center. Metal sheets provide enough support to cover holes that are a few inches across in either direction. Center the metal patch over the hole and press the self-adhesive mesh onto the surrounding drywall. Seal the edges with tape and apply spackle as directed in the previous instructions. It will likely take a few layers of compound or spackle to completely cover the mesh and tape, so be patient when waiting between layers.
Cut and Patch Larger Holes

For a hole, dent, or gap that’s larger than 2 or 3 inches on any side, you’ll need to cut out the damaged drywall and insert a properly sized replacement piece. While this does take some careful measuring and cutting, it’s a good project for developing homeowner DIY skills. You’ll need a carpenter’s square, a drywall saw, a drill, and a pencil. Pick up a sheet of drywall with the same thickness, a roll of drywall tape, a container of drywall compound, a handful of drywall screws, and a length of furring strip.
1. Measure and Cut the Damage

Use the carpenter’s square to mark the wall around the dent or hole. Make sure to leave at least one inch of solid material around the damaged edges. Draw four clear plans to guide your cuts and choose a rectangular or square shape that covers the area to minimize cuts. Before starting, check for studs and wiring behind the areas that you plan to cut. Once you’re ready, gently insert the drywall saw and cut along the lines until there’s a smooth area to patch. Measure the opening and cut a piece of drywall from the new sheet to serve as the patch.
2. Install the Supports and the Patch

To keep the patch from shifting while you cover it with compound, use supports to hold it up. Cut two pieces from the wood furring strip that are at least 2–3 inches longer than the widest part of the wall opening. Insert these two strips along the two longest sides and screw through the drywall to secure them in place. Slip the patch into the opening and use four more drywall screws to secure it to the furring strips.
3. Seal and Cover

Now it’s as simple as taping the seams around the patch and covering it all in drywall compound. Keep applying layers of compound and sanding when dry until you’re happy with the look.
No matter the method you choose, you’ll get decent results with a little effort. With enough practice, you can even have nearly invisible patches. Don’t be afraid to give this project a try if you’re new to homeowner DIY work.


")

")


")
")

